News & Events
Is It Really Necessary to Stay Stitch Garments
No Comments
Yes, stay stitching is truly necessary for professional, long-lasting garment construction, especially when working with woven fabrics and precision tailoring.
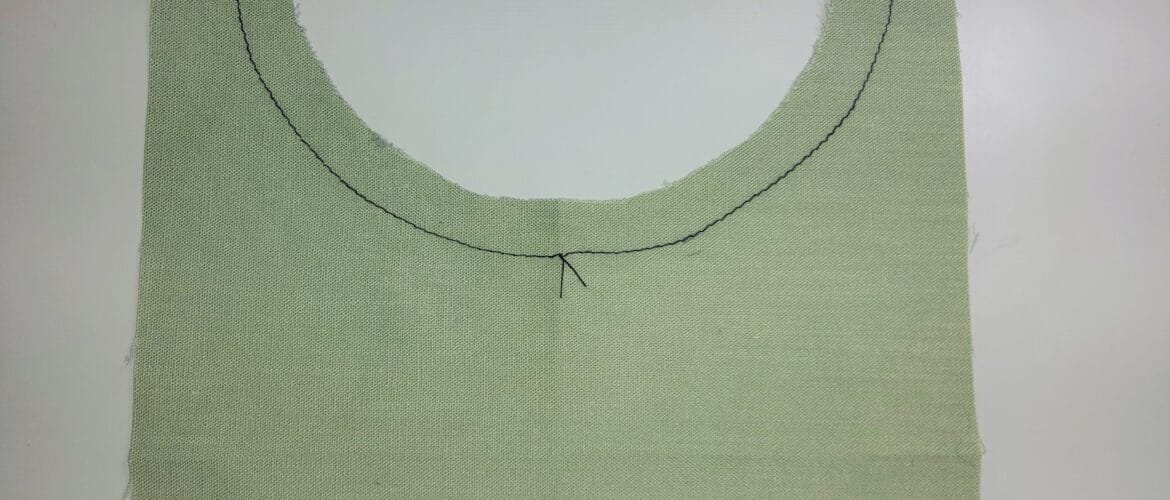
Stay stitching is a straight machine stitch sewn close to a raw edge before the garment pieces are assembled. Here is why it is an essential step.
I once spent an entire Saturday on a blouse for my granddaughter’s graduation. Cut the pieces, pinned the neckline, and by the time I got to the collar, that once crisp curve had stretched into a soft, wavy mess. I had handled it too much while fitting, and there was no fixing it without recutting the whole piece.
That is exactly what stay stitching prevents, and it matters even more on the kinds of garments many of us make. Larger pattern pieces have more curved edge to stretch. Fuller busts and hips often mean more try-ons and adjustments before a piece is finished, which means more handling of that raw edge before it is ever sewn shut. This is not an extra step. It is what keeps your fabric the shape you cut it, through all of that handling.
This stitch is essential because it anchors your fabric before handling, pinning, or machine feeding has a chance to pull it out of shape. By placing a line of stitching you lock the grain in place, preventing curves and bias edges from “growing” during construction.
Technical Specifications
- Stitch Length: Keep it short, 1.5 mm to 2.0 mm. A shorter stitch gives you better control and ensures the threads don’t pop under tension.
- Placement: Stitch 1/8 inch (3 mm) away from the seam line, inside the seam allowance. This keeps your stabilizing line safely hidden inside the final garment.
Stitching the Neckline
To keep your necklines crisp and gap-free, you must respect the grain. Always stitch from the outer edge (the shoulder) toward the center of the garment.
- Right Side: Start at the shoulder and stitch toward the center front.
- Left Side: Start at the other shoulder and stitch toward the center front.
Moving from the shoulders toward the center prevents you from pulling or distorting the shape as you work. Never stitch in one continuous line from shoulder to shoulder; crossing the center point often drags the fabric out of alignment.
Stay Stitching the Armscye
The armscye is prone to shifting because it cuts across the grain. Use the same directional principle here.
- Start at the shoulder notch: Begin at the most stable point at the top of the shoulder.
- Stitch toward the underarm: Move downward toward the underarm area.
- Repeat for both sides: Always stitch from the shoulder down to the underarm for both the front and back pieces.
By stitching from the stable shoulder down into the curve, you prevent the feed dogs from pushing or stretching the fabric into a distorted shape.
Stay Stitching Side Seams with a Waist Indentation
When your pattern features a side seam that curves in at the waist, you need to work from the widest parts toward the narrowest point.
- From the armscye: Start at the underarm and stitch down toward the waist indentation.
- From the hem: Start at the hip and stitch up toward the waist indentation.
Stitching toward the smallest point of the waist keeps the fabric stable and prevents the “bubbling” or twisting that often happens at the narrowest part of a bodice.
Handling Princess Lines
Princess seams involve significant curves that cut across the grain, making them highly susceptible to stretching. Stay stitch your center and side panels individually before joining them.
- For the Center Panel: Start at the top (near the armscye or shoulder) and stitch downward toward the waistline.
- For the Side Panel: Start at the top (near the armscye or shoulder) and stitch downward toward the waistline.
Once both curved edges are anchored, they will hold their intended shape, making it much easier to match your notches without the fabric growing or becoming wavy.
A Note on Fabric Choice
Keep in mind that the drape of your fabric dictates how much care you need to take. A stable wool gabardine is much more forgiving than a loose-weave rayon or a fluid silk charmeuse. If your fabric is particularly drapey or lightweight, stay stitching is not optional, it is the only thing keeping your garment from becoming a different size than you intended.
Pro Tips for Professional Results
- Skip the Backstitch: Never backstitch at the beginning or end of your stay stitching. It adds bulk and causes puckering right where you need precision. Instead, leave long thread tails and tie them off by hand if necessary.
- Prevent “Fabric Munching”: To keep your machine from pulling the start of your fabric into the throat plate, begin stitching about 1/2 inch away from the raw edge, sew off the edge, and then pivot back to finish the starting section.
- The Check-and-Adjust: Lay your paper pattern piece directly over your stay-stitched fabric. If it has shifted, use a pin to gently nudge the threads to ease the fabric back into its original shape. A light touch of steam can also help the fibers relax back into position.
Which Edge Should You Stay Stitch?
- Necklines: Always, especially on wovens or anything with a curve.
- Armscyes: Always, since they cut across the grain.
- Curved side seams or princess seams: Always, before joining pieces.
- Straight seams with no curve: Not necessary.
Get those edges stay stitched first, and the rest of your construction will go a lot smoother.