News & Events
The Waistband: The Anchor of a Woman’s Tailored Trouser
No Comments
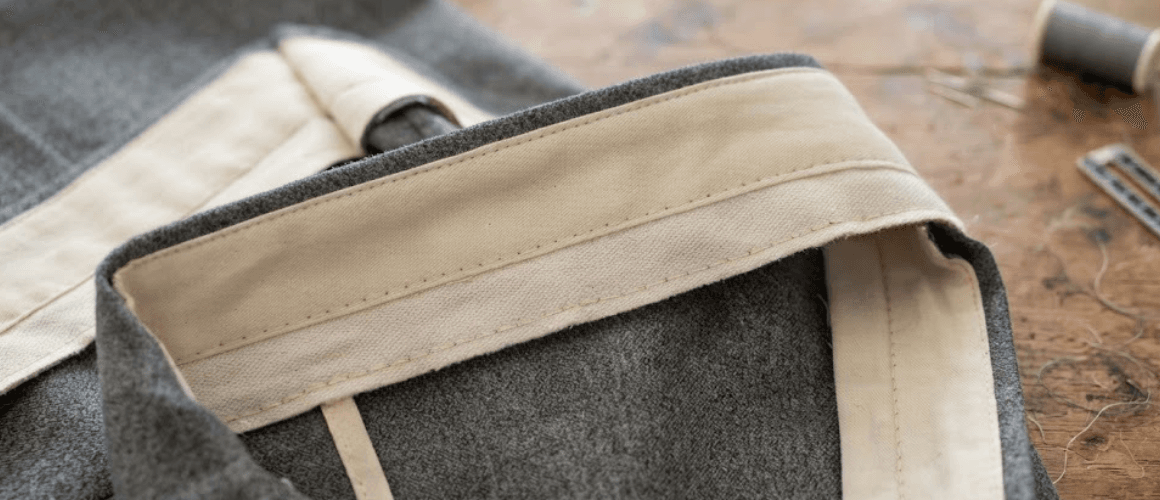
When a pair of trousers fits well at the waist, the whole garment feels stable. The waistband is the anchor: the single component that holds the trousers in place, distributes pressure evenly, and gives every other fitting decision something to work against. Get it right, and the rest of the construction has a fighting chance. Get it wrong, and no amount of careful pleat placement or crotch adjustment will save the result.
This article is the second in The Tailored Trouser Series, written for intermediate home sewists who want garments that look refined and feel comfortable, especially plus-size senior sewists whose bodies may not match the assumptions built into commercial patterns.
What the Waistband Does
A tailored waistband does three things at once. It grips the body firmly enough that the trousers stay put through sitting, bending, and reaching. It distributes that grip across a band of fabric wide enough that the pressure does not dig or roll. And it provides a clean, structured edge that frames the top of the trousers: the visual transition between the body and the garment.
A waistband that fails at any of these jobs is immediately noticeable. The trouser sags, twists, gaps at the back, or digs into soft tissue. For sewists whose midsections are fuller, rounder, or changed by age, surgery, or weight fluctuation, the waistband is often the first place a garment stops working and the first place that needs a thoughtful, individualized approach.
The Parts of a Tailored Waistband
A tailored waistband is made up of several parts working together, and each one has a job to do.
The outer waistband is the visible band on the outside of the trouser. It gives the garment its finished look and takes most of the strain when you sit, bend, or reach.
The inner waistband, or facing, sits against your skin. It finishes the inside cleanly and can be cut from a softer fabric for comfort.
Interfacing is the stabilizing layer fused or sewn inside the outer waistband. It keeps the band crisp, stops it from rolling over, and gives the closure something solid to hold onto.
The closure extension is the tab that extends past the button or hook-and-bar, giving the closure fabric to fasten into. The underlap is the opposite side of the waistband, the piece that sits underneath and stays hidden. It receives the button or hook and keeps the closure from showing on the outside.
Belt loops are the narrow fabric tubes stitched into the waistband seam. They let you add a belt for extra support or styling.
Every one of these parts contributes to fit and comfort. A too-narrow interfacing lets the band collapse. A too-short underlap exposes the closure. A facing cut from scratchy fabric turns a beautiful trouser into something you can’t wait to take off. Understanding these components, and choosing materials and widths with intention, is what makes a waistband work for your body.
Straight or Contoured
Waistbands fall into two families: straight-cut bands, which are flat rectangles sewn into a circle, and contoured bands, which are shaped with seams or curves to follow the body’s natural waistline. Each has strengths, and each suits different bodies and different trouser styles. We’ll explore how to choose between them and how to decide which is right for your figure and your pattern in a forthcoming article.
Checking Waistband Fit While Standing and Sitting
Fit at the waistband reveals itself only when the body moves. Here is what to check:
Standing: Look for a band that sits level at the intended waistline (or hip, if that’s the design), lies flat without puckering or straining at the seam, and doesn’t gap at the back or pull down at the front. Run a hand around the inside: the facing should feel smooth, with no twisting or rolling. The closure should fasten without the fabric stretching or the band distorting.
Sit in a chair and notice what changes. A well-fitting waistband stays in contact with the body without digging, rolling, or cutting into the midsection. The front of the band may relax slightly. This is normal because the body shortens from front to back when seated. However, the waistband should not collapse, pouch, or press hard enough to leave a mark. Stand back up and check that the band returns to its original position without sagging or twisting.
For a deeper look at how waistband width, shape, and fit affect comfort, read Threads magazine’s guide to understanding the waistband.
For plus-size and senior sewists, the sitting test is especially revealing. Bodies that are fuller through the middle change shape more dramatically between standing and sitting, and a waistband that looks perfectly upright can become unbearable once you sit down. Always fit both positions.
Common Waistband Problems and Where to Look
| Problem | Likely Area to Investigate |
|---|---|
| Gaping at center back | Rise length, waistband curve, or back dart placement |
| Rolling or folding over | Interfacing too light, band too narrow, or tension too tight |
| Digging or cutting in | Band too narrow, closure too tight, or fabric too rigid |
| Pouching at front when seated | Rise too short or band too straight for a fuller abdomen |
| Waistband twisting after sitting | Waistband circumference vs. body circumference mismatch |
| Closure pulling or distorting | Extension too short or interfacing insufficient at the closure |
Before You Cut
Before you commit fabric to a waistband, walk through this short checklist:
- Confirm your waist (or hip) measurement taken on the body, not over clothing.
- Decide your intended waistband width: narrower for a lower, hip-slung look; wider for a classic, structured waistband.
- Choose a facing fabric that feels comfortable against bare skin.
- Select an interfacing weight that matches your fashion fabric: firm enough to hold shape, soft enough not to stand rigidly away from the body.
- Plan your closure type and confirm the extension and underlap are long enough for it.
- Mark grainlines on all waistband pieces so the band behaves predictably.
Free Download
Before you cut your next trouser, skirt, or dress, take seven key measurements that will tell you exactly how your waistband should be shaped and sized. Download The Beautiful Waist Fitting Checklist: 7 Measurements to Take Before You Cut Your Next Skirt or Dress, a free one-page guide designed for real bodies, not pattern envelopes.
Continue the Series
This article is Part 2 of The Tailored Trouser Series. Coming up next:
Part 3 Straight or Contoured? Choosing the Right Waistband for Your Body and Trousers